2 Install core software on Ubuntu
dpkg --print-architecture: retrieve architecture, for package installation1.- Ctrl-HCtrl-H in Gnome, aka File Management, to list hidden files
2.1 Ubuntu general guidelines
2.1.1 Recommended system libraries to install
# Install system libs
sudo apt-get update
sudo apt-get install -y \
    apt-transport-https \
    build-essential \
    ca-certificates \
    cloud-guest-utils \
    curl \
    default-jre \
    f2c \
    gdebi-core \
    gnupg \
    libbz2-dev \
    libcurl4-openssl-dev \
    libffi-dev \
    libfontconfig1-dev \
    libfribidi-dev \
    libgsl0-dev \
    libgtextutils-dev \
    libharfbuzz-dev \
    libicu-dev \
    liblzma-dev \
    libncurses5-dev \
    libncursesw5-dev \
    libpcre3 \
    libpcre3-dev \
    libperl-dev \
    libreadline-dev \
    libssl-dev \
    libtiff-dev \
    libxml2-dev \
    locales \
    ncftp \
    pandoc \
    parallel \
    pkg-config \
    readline-doc \
    sudo \
    tcl \
    tk \
    tk-dev \
    tk-table \
    tmux \
    tzdata \
    unzip \
    vim \
    && sleep 1
2.1.2 Ubuntu file, and package structure
2.1.2.1 System-wide location (for core programs)
System-wide affects all users, are installed using sudo, on the root of the system.
| Location | Purpose |
|---|---|
/usr/bin |
System executables (APT) |
/etc |
System-wide configuration (example: define repositories for apt) |
/opt |
Vendor (external) apps |
/usr/local/bin |
Admin-installed software |
/var |
Logs, caches, databases |
/optfor third-party application bundles, self-contained while/usr/localis for third-party binaries. Besides,/optis not in the path by default.
2.1.2.2 User-specific locations
User does not require root
| Location | Purpose |
|---|---|
~/Applications |
AppImages |
~/.local/bin |
User executables |
~/scripts/tools |
Custom bash executables |
~/.local/share |
User app data, notably ~/.local/share/applications storing desktop icons |
~/.config |
User configuration |
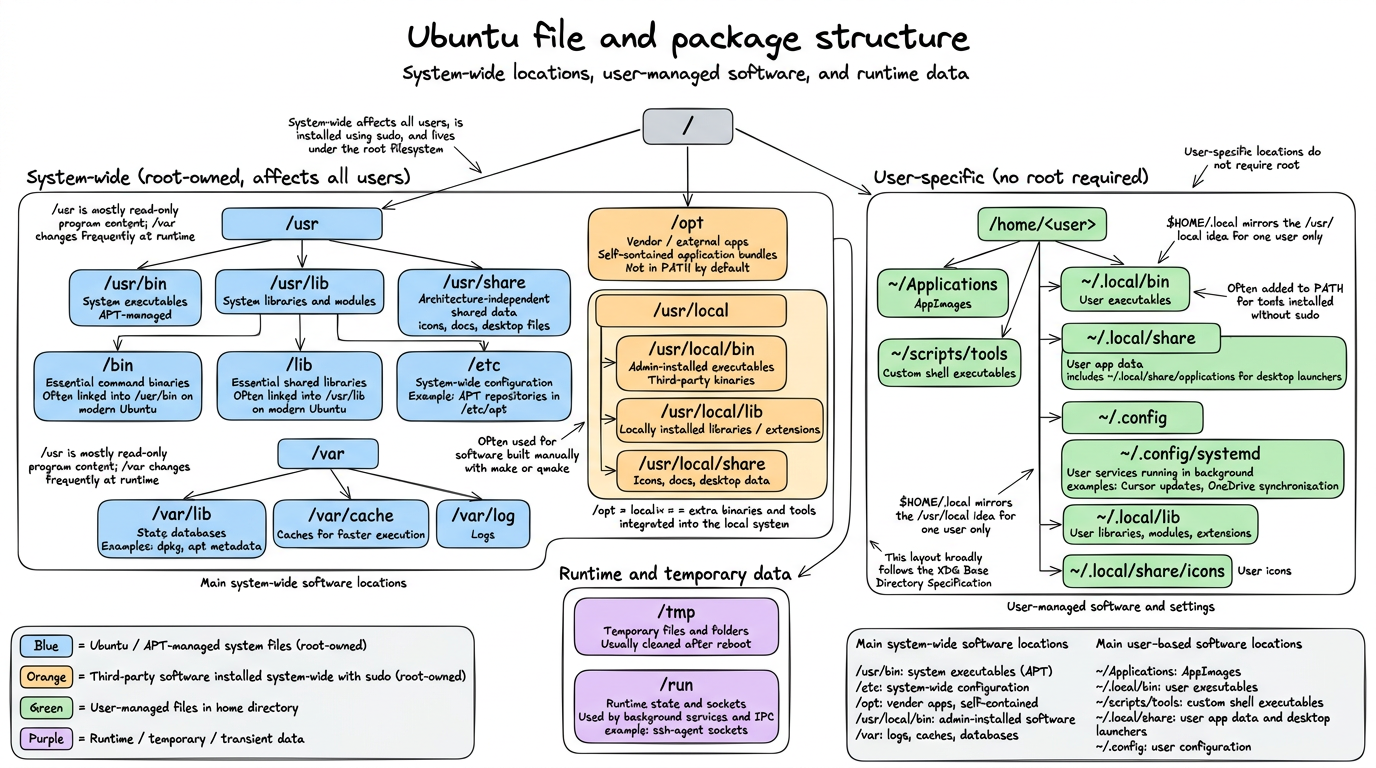
usrfolder stores read-only executables, while/varis regularly written upon changes:/var/lib: apt and dpkg databases, for instance, respectively stored underdpkg, and/apt/var/cache: metadata caches for faster execution
/usr/local/, or$HOME/.localstores executables that require custom compilation withmake, orqmake, rendered from manual archives:bin,sbinfor executablessharefor icons (under subfoldericons) and desktop configuration, document ion under/doclibfor extensions of a given executable (such as packages in R, or modules in Python)- This folder hierarchy follows
XGDBase Directory Npecification
/tmpfor temporary folders, cleaned afterreboot/runfor sockets, namely used for controlling all the protocols running in the background for connecting to a server, such as thessh-agent~/.config/systemd: lists all processes that keep on running in the background, such as Cursor updates, or One drive synchronisations.
2.1.3 Recommended Updating policy of Ubuntu
- Create file
update_os.shwith:
#!/bin/bash
rm -rf /var/lib/dpkg/lock-frontend
rm -rf /var/lib/dpkg/lock
apt-get update
apt-get upgrade -y
apt-get dist-upgrade -y
apt-get autoremove -y
apt-get autoclean -y- Run having
sudorights
chmod +x update_os.shto provide executive rightssudo ./update_os.shto run the update file with admin rights
- Reboot the system with
reboot
Partial updates breaking key driver components occur more often with Ubuntu compared to Microsoft, since Linux tends to provide lots of separate, modular packages while Windows ships large and standalone bundles -> Consequence: more issues with updates, especially if the network connection dropped, and the newest versions of the packages were not fully installed.
General recommendations:
# to be run daily
sudo apt update
sudo apt upgrade

# to be run monthly
sudo apt full-upgrade

## clean deprecated dependencies
sudo apt autoremove
sudo apt autoclean
Deal driver issues
## Check for Broken Packages
sudo dpkg --configure -a
## Install missing dependencies
sudo apt -f install

## List all Hardware Driver Errors
dmesg -l err,crit,alert,emerg
2.1.4 Monitor processes running in the background, and on startup
systemctl list-unit-files --type=service --state=running --userto list all processes running in the background, even after rebooting, restrained to the user-level.- Alternatively, processes at the system-level are stored under
/lib/systemd/system/
- Alternatively, processes at the system-level are stored under
systemctl status <service>retrieves current status
2.1.5 Network protocols, and connexion troubleshoots
Two IP protocols for Wi-FI:
IPv4versusIPv6.TipThe two Internet protocols, namely IPv4 vs IPv6IPv4 is older, but still prevailing in many websites, such as Github, or OneDrive:
- Uses 32-bit addresses (e.g.
192.168.1.10) - Used by most websites, CDNs, VPNs, corporate services
- But the 32-limitation hinders the number of avalaible IP addresses.
IPv6 is newer, but not universally supported:
- Uses 128-bit addresses (e.g.
2a01:cb14:86a7::1) - Supported by modern ISPs and operating systems
- Some networks provide IPv6-only, with no IPv4 fallback. Espaically the case with Microsoft services, governmental or academic websites.
- Uses 32-bit addresses (e.g.
You can test if this is the issue to connect to some websites with
curl <webdomain>, such ascurl https://onedrive.live.com, returning Cannot connectRecent modern routers return only IPv6 -> while Windows is able to able to auto-fall back to IPv4, this is not the case of IPv6.
- Temporary fix: by running the following instructions, you solve this issue by automatically configuring a IPv4 upon failure. Recommended only for short-term debugging.
install dhclient commands
sudo dhclient -4 wlp2s0f0 <Wifi-name> ## in my case, wlp2s0f0
Permanent fix2:
nmcli connection modify "Routeur/Livebox-FC77" ipv4.method auto
nmcli connection modify "Routeur/Livebox-FC77" ipv6.method auto ## connect automatically to IPv4 or IPv6, depending on the availitbity of the protocol
## re-start the connection, applying the new configuration parameters
nmcli connection down "Routeur/Livebox-FC77"
nmcli connection up "Routeur/Livebox-FC77"
2.1.5.1 Eduroam connexion
- Ensure to delete beforehand any pre-existing installation:
rm -rf $HOME/.config/cat_installer. - Go to https://cat.eduroam.org/, the website usually provides with the version fitting your OS distribution.
- On Linux, download the Python script, choosing AMU university.
- Run Python script with
python 3 eduroam-linux-AUA.py - As
userid, provide your academic mail address, and as password, yourENT password.
2.1.6 Pimp your shell: switch from boring Bash to fancy Zsh
- Installation script:
sudo apt update
sudo apt install zsh

## change the default shell shebang
chsh -s $(which zsh) ## modify /etc/passwd repository
reboot # required log out for effective changes

## check if zsh is used by default (also the theme is modifed)
getent passwd "$USER" -> return "/home/bastien:/usr/bin/zsh"

## Install advanced customisation of the shell with Install Oh My Zsh addon
sh -c "$(curl -fsSL https://raw.githubusercontent.com/ohmyzsh/ohmyzsh/master/tools/install.sh)" # create automatically the ~/.zshrc configuration file
You should keep the original ~/.bashrc as a fallback for Bash.
- Install the modern alternative to
ls, namelyeza
# install the gpg command
sudo apt update
sudo apt install -y gpg

# install eza
wget -qO- https://raw.githubusercontent.com/eza-community/eza/main/deb.asc | sudo gpg --dearmor -o /etc/apt/keyrings/gierens.gpg
echo "deb [signed-by=/etc/apt/keyrings/gierens.gpg] http://deb.gierens.de stable main" | sudo tee /etc/apt/sources.list.d/gierens.list
sudo chmod 644 /etc/apt/keyrings/gierens.gpg /etc/apt/sources.list.d/gierens.list
sudo apt update
sudo apt install -y eza- Change the behaviour of the shell:
System-wide: all exe installed under
/usrfolder can be called directly from the$PATH. For third-party apps stored under/opt, you must add a symlink redirecting to your local folder:sudo ln -s /opt/<appName> /usr/local/bin/<appName>.User-level: customise
.bashrc(and.zshrcif using the.zshfancy shebang) -> Only affects the current user, see my own.zshrcconfiguration file, and belowlsoutput Figure 2.1.

ls output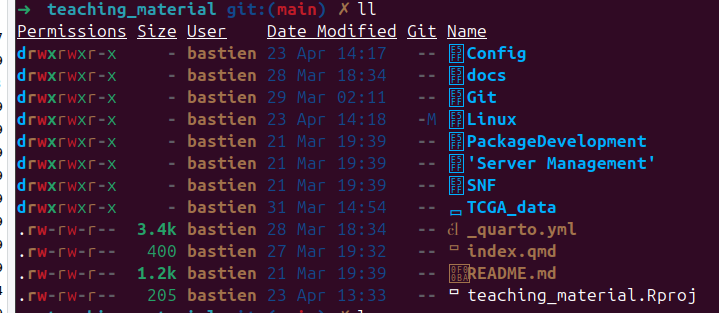
ll output, displaying addition to file names their sizes, permission rights, and original proprietary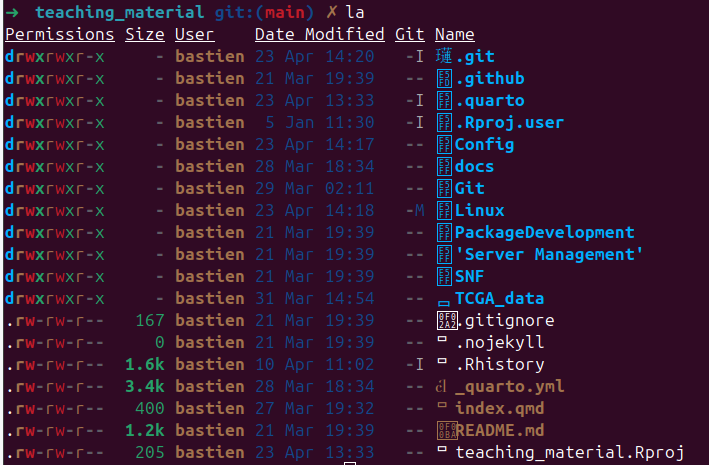
la output displays in addition to the lloutput the hidden files (traitdionally starting with a .)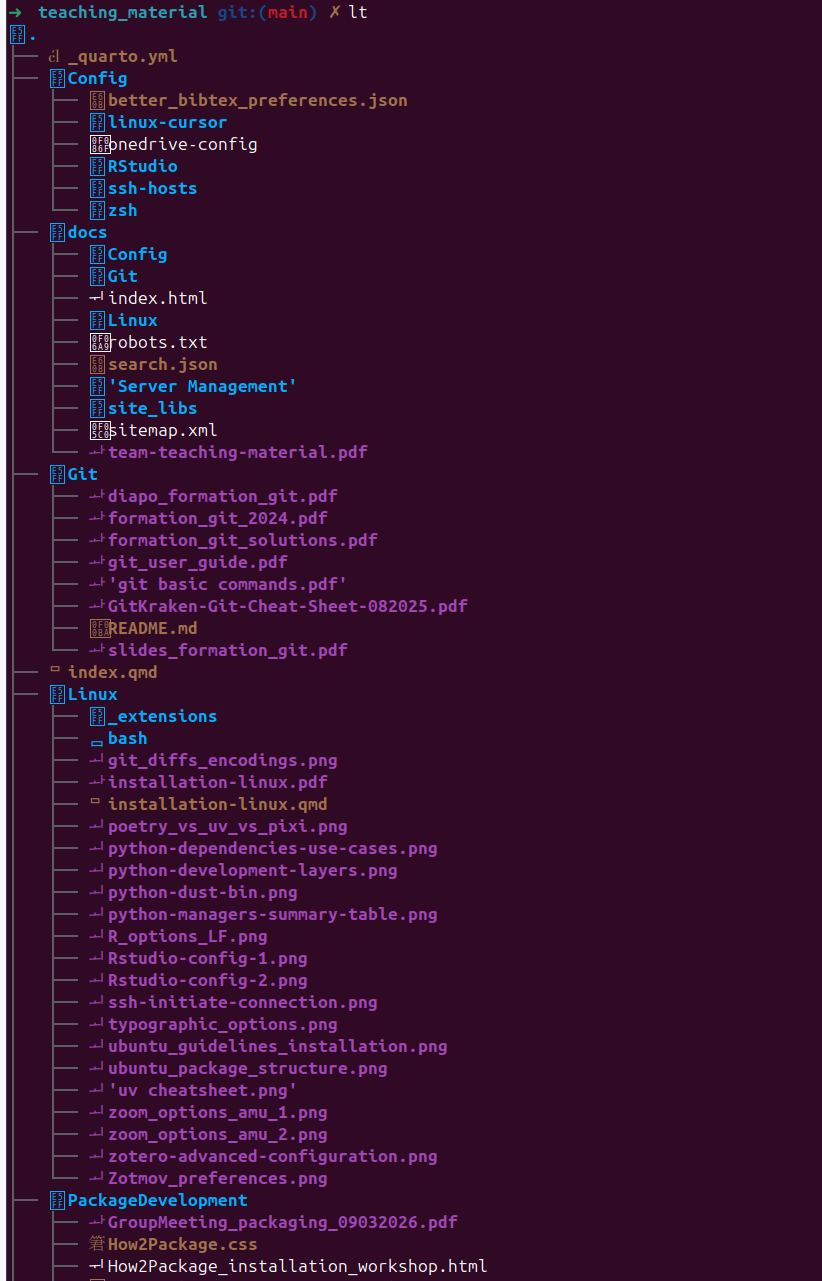
lt output is combination of both lsand treeto display the hierarchical structure of a folderlscommands to display the content of a folder from a Bash terminal.
Useful resources:
2.2 Synchronise files across devices with OneDrive
2.2.1 OneDrive open-source installation for Ubuntu
- Install dependencies:
sudo apt install build-essential libcurl4-openssl-dev pkg-config git -y- Add the
OpenSuSEBuild Service repository release key
wget -qO - https://download.opensuse.org/repositories/home:/npreining:/debian-ubuntu-onedrive/xUbuntu_24.04/Release.key | gpg --dearmor | sudo tee /usr/share/keyrings/obs-onedrive.gpg > /dev/null

echo "deb [arch=$(dpkg --print-architecture) signed-by=/usr/share/keyrings/obs-onedrive.gpg] https://download.opensuse.org/repositories/home:/npreining:/debian-ubuntu-onedrive/xUbuntu_24.04/ ./" | sudo tee /etc/apt/sources.list.d/onedrive.list

## update cache
sudo apt-get update- Install
OneDrive:
sudo apt install --no-install-recommends --no-install-suggests onedrive- Sync OneDrive:
Exclude large folders, and directories that are complex and are not recommended for syncing,
nano ~/.config/onedrive/config. You can see the actual content of my config file under onedrive-custom-config.3Authenticate, and run OneDrive once
onedrive --sync --dry-run ## optional, list folders that will be synchronsied
onedrive --sync --verbose ## first initialisation, usually time-consuming, one-shot- Permanent synchronization using
systemtclfacilities. Choose either this approach, or the visual approach detailed in Tip 2.1, as they can’t operate simultaneously.
systemctl --user enable onedrive
systemctl --user start onedrive ## in the back end, use onedrive --monitor- Monitor currently uploaded files:
journalctl --user-unit onedrive -f (continous) ## equivalent to systemctl --user status onedrive (single-shot)

onedrive --display-config
onedrive --version- Other useful OneDrive instructions:
onedrive --create-share-link <path/to/file>for read-only shareable links, andonedrive --create-share-link <path/to/file> --with-editing-permsto add writing rights.
OneDrive system tray program adds a simple icon returning the status of synchronization for OneDrive.
Installation bash:
## install the 5th version of qmake
sudo apt install qt5-qmake qtbase5-dev

## create the runnable executive file
git clone https://github.com/DanielBorgesOliveira/onedrive_tray.git
cd onedrive_tray
mkdir build
cd build
/usr/lib/qt5/bin/qmake ../systray.pro ## prepare the configuration, such as Makefile
make ## build the software

## execute it, such that it runs whenever log in
sudo make install ## deploy the software, such as copying files -> here's the sudo incentive
systemctl enable --user onedrive_tray.service
Colour the logs output reported on the terminal:
- Install dependencies:
sudo apt install silversearcher-ag ccze - Add
onedrive_logbash file into folder~/scripts/tools. - Add permanently to the
$PATHby modifying the~/.bashrcfile:export PATH="$PATH:$HOME/scripts/tools"/
2.2.2 Troubleshoots for OneDrive
Call
systemctl --user restart onedriveafter modifying the.configfile to account for changes within it. For retro-application of configuration changes, useonedrive --resync --sync --verbosewith parsimony. The synchronisation halts without warning, when the config file is modified, so you need to restart it.Warning “onedrive application is already running, please check process list” means that several concurrent onedrive are running in the background:
- List existing processes using onedrive:
ps aux | grep onedrive - Force kill processes that do no not use
systemtcl: kill -9 - \(90\%\) of the time is that you’re simultaneously running UI OneDrive, and in the background
systemtclfor synchronising processes
- List existing processes using onedrive:
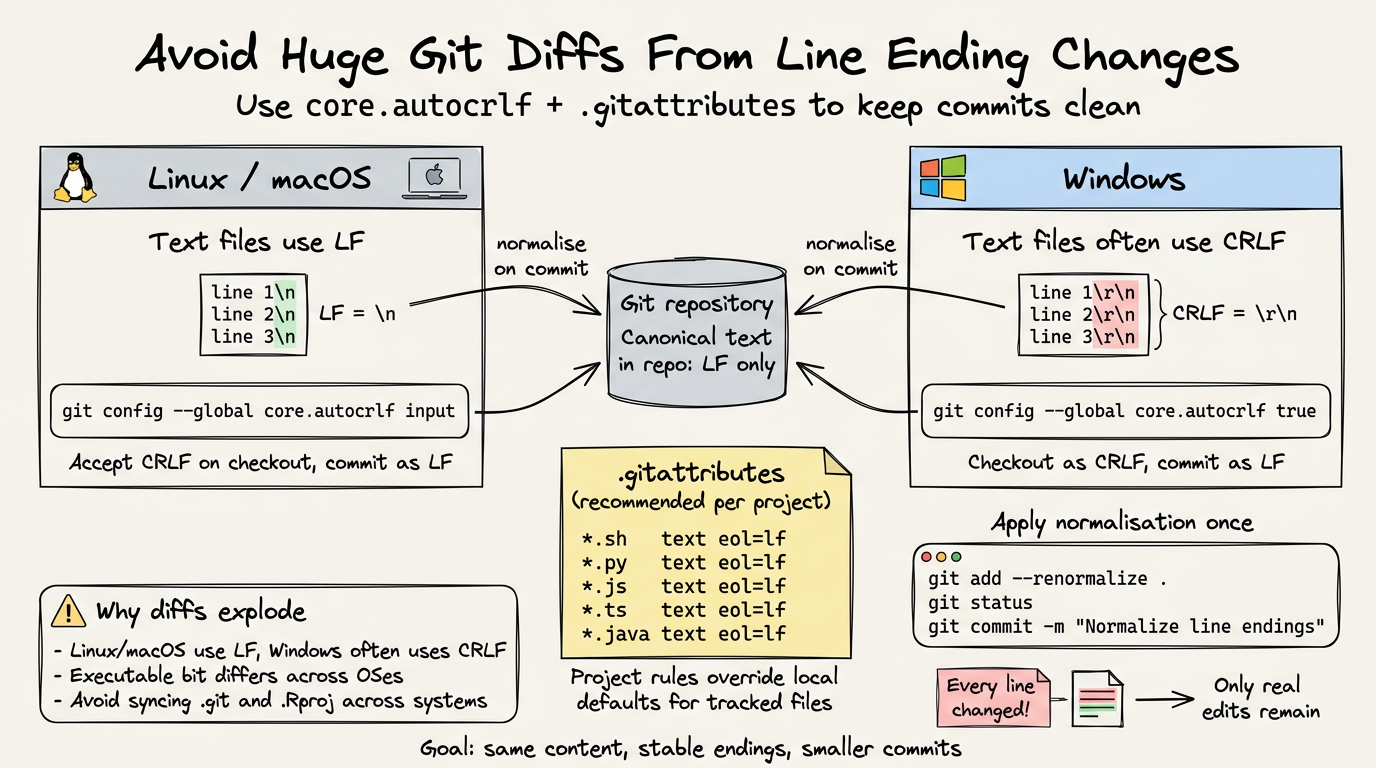
Git and OneDrive do not combine well for:
- Different encoding of end of line: Linux (and Mac) machines end lines with
LF (Line Feed): \n, while Windows usesCRLF (Carriage Return + Lien Feed): \r\n - Linux tracks file permissions for executables while Windows doesn’t (only problematic for shell scripts)
.gitand.Rprojfolders are complex binary repositories often OS dependent.
To avoid these issues:
Configure globally the
.gitconfigconfiguration file to allow both end of lines indicators, usinggit config --global core.autocrlf inputon Linux and Mac machines collaborating with Windows machines4, andgit config --global core.autocrlf trueon Windows machines5.For further robustness, create a
.gitattributesdotfile per project6:
## 3 columns: file extension, file type (text, or binary), eol definition for text documents
*.sh   text eol=lf
*.py   text eol=lf
*.js   text eol=lf
*.ts   text eol=lf
*.java text eol=lf
Then, apply the changes with the following Git commands^[this command first identifies all files tracked by Git, then apply to every file the end of line normalisation rule, with `.gitattributes` prevailing over the global `core.autocrlf` option]git add --renormalize .
git status ## display files being impacted by the change of EOL encoding
git commit -m "Normalize line endings"- Configure the editor default end of line encoding:
- VS Code: Shift-Ctrl-PShift-Ctrl-P, then type “Open VS Code Settings”, then go to “Files:EOL”, and set end of line as
\n - RStudio:
Tools → Global Options → Code → Saving -> Line ending Conversion → (Posix) LF.
Avoid using graphical interfaces, such as OneDriveGUI, they poorly concur with local installation of onedrive on my personal experiment.
Instead, rely on the terminal, as it usually provides the user with better customisation, and control on OneDrive configuration.
Many modern editors, such as LibreOffice and Rstudio use atomic save strategies to preserve data integrity when writing files.
file.qmd
↓ edit
file.qmd.tmp ## If OneDrive synchronises in the meantime, it believes that the file had been discarded
↓ rename
file.qmd


## Architecture causing this problem
RStudio
   │
   │ save
   ▼
Local file (.qmd)
   │
   │ filesystem event
   ▼
onedrive client
   │
   │ sync
   ▼
OneDrive cloud
   │
   │ sync back
   ▼
local overwrite
This process is likely to interfere with the regular synchronisation protocol of the onedrive client relying on inotify, triggering editor warnings, or even temporary removal of files contents.
Three complementary solutions to address these issues, and reduce conflicts between editor saves and sync detection.
- Do not put active projects inside
OneDrive, setting apart large documents storage synchronised with OneDrive, from source code version by Git. - Pause sync while coding. But you need to think about restarting the synchronisation afterwards.
- Twist the configuration file, helping with editors using atomic saves:
force_session_upload = "true" ## avoid overwriting by older cloud versions, when RStudio is on its way of saving
delay_inotify_processing = "true" ## wait for RStudio to finalise the saving of tmp files before synchronising to OneDrive
2.3 Software to install
**General recommendation*: avoid using
ChatGPT, as the instructions for installing software are often deprecated and/or not following Ubuntu best guidelines.
Three recommended methods, depending on Ubuntu’s support:
- If supported by Ubuntu, go for
apt installfor system software7:
automatic updates and security patches -> it’s the only method allowing it in a systematic way.
easiest method for installation
signed and verified packages
recommended for core system, long-term software
If not directly available on Ubuntu’s native package manager, or using in the back-end
snapcommands, switch to pre-built tarball installation8, or add the repository (only if trusted) toapt allowed keysfolder. Example forDocker, Section 2.3.6, or custom Zotero installation file..deb files are intended for Linux distributions derived from Debian (such as Ubuntu, Linux Mint, etc.), while .rpm files are mainly used by distributions derived from Red Hat–based systems (such as Fedora, CentOS, and RHEL) +
openSUSEdistribution:- No auto-updates
- Potential dependency issues
- Always install with
sudo apt install, rather thansudo dpkg -i, to better solve dependencies, fix broken installs, and ensures system consistency.
AppImagesare standalone executable files, bundling the application and most of its dependencies:
- Recommended for desktop applications to be installed only on the user account -> does not require
sudorights in most cases - Portable
AppImageLaunchercan help in organising all AppImages within the same folder + integrate them into the system menus:- Relevant if using multiple AppImages
- Avoid
Snap
- Pre-built tarball (
.tar(gz|xz)) archives:
- Stronger customisation
- Works without distribution packages
- Requires manual handling/no automatic updates
- Only recommended for developers, or if nothing else exists.
- And now, the least recommended installations:
snapstores pre-compiled versions of tools, but are less recommended compared to standard installation withsudo apt installFlatPak+Flathub
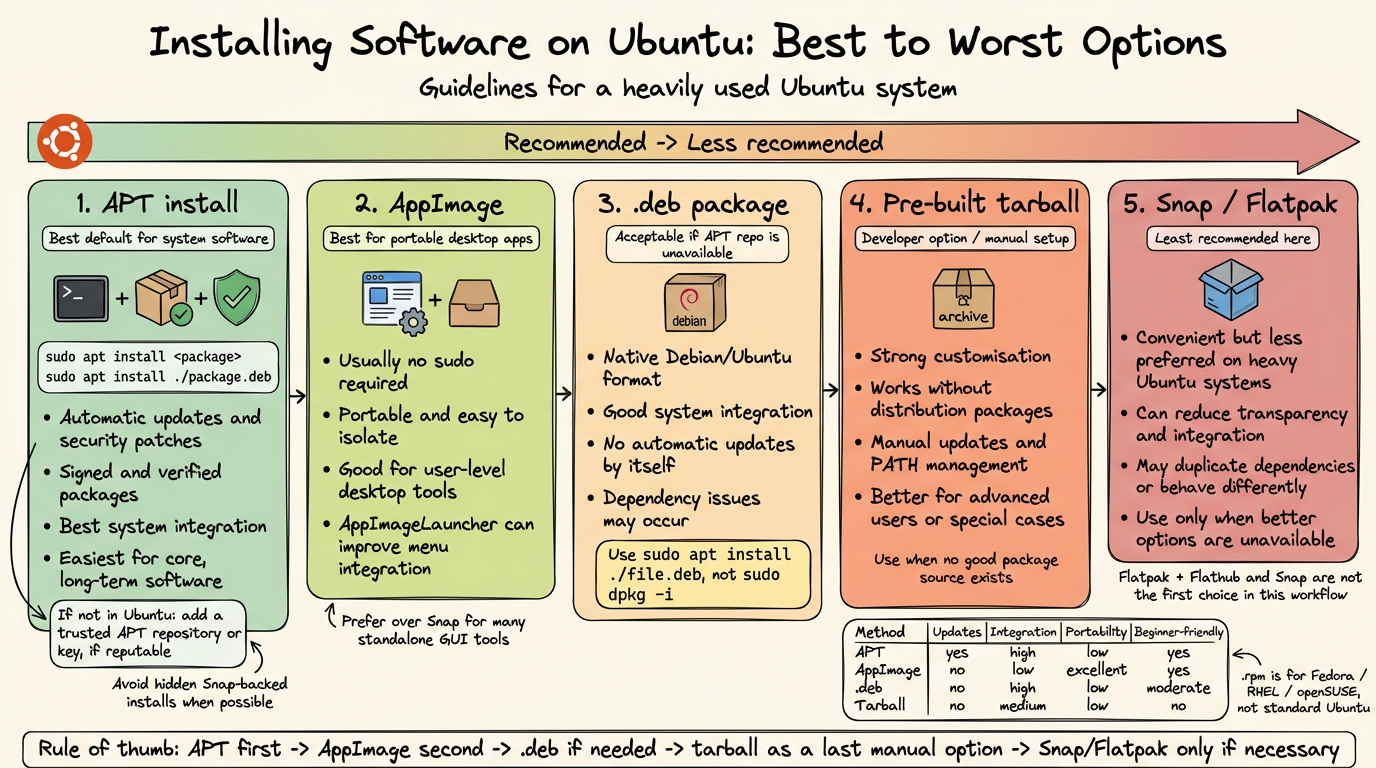
portable, or not. Portable installation is easier to remove, as it does not leave leftovers in the core system, but does not allow for automatic updates. On the other hand, non-portable applications are usually better for daily/intensive use, but not sandboxed, and harder to remove.
2.3.1 Git and GitHub configuration
Github often requires double authentication, that you can set on https://github.com/settings/security. Recommended to use passkey if supported by your device (unfortunately, Linux OS usually do not support it), or use authenticator app, such as Microsoft Authentificator. Deterred against the use of SMS + mobile phones.
Configure your access to Github:
- Choose either SSH, or HTTPs.
- For HTTPS, configure one token per device, under https://github.com/settings/tokens. Give the token the name of your laptop, its configuration and originals owner. Assign it at least the repo and read scopes. Copy it once -> it won’t be available afterwards!!.
- General options to configure:
- Use either the command line (create also automatically the file
~/.gitconfig):
git config --global user.name "bastienchassagnol"
git config --global user.email "bastien.chassagnol@univ-amu.fr"- Or directly, using text editor, file
~/.gitconfig(more error-prone to indentation errors). Find my default git config file here (for comprehensive description of options, report to Formation Git 2024, a tutorial by Benjamin):
[user]
  name = bastienchassagnol
  email = bastien.chassagnol@univ-amu.fr
## modern default git options
[init]
  defaultBranch = main

## simplifying solving git conflicts + troubleshoot solving
[merge]
  conflictstyle = zdiff3
[rerere]
  enabled = true

## tolerate distinct end of lines
[core]
  autocrlf = input

## visualisation
[tag]
  sort = version:refname
[branch]
  sort = -committerdate
[credential]
helper = store- Avoid typing your password for every login:
- For HTTPS + PAT token protocol, use
git config --global credential.helper storefor permanent registration of the password (should we not encrypt the file??), orgit config --global credential.helper 'cache --timeout=3600'for temporary access9. - Define SSH key.
2.3.2 AppImageLauncher
## download the .deb archive, with the proper architecture configuration
## https://github.com/TheAssassin/AppImageLauncher/releases/tag/v3.0.0-beta-3

sudo apt install appimagelauncher_3.0.0-beta-2-gha287.96cb937_amd64.deb

## update dependencies
sudo apt update
sudo apt install -f- For deleting apps installed with AppImage Launcher, you’ll need to delete both Applications folder, and
~/.local/share/applications/that stores executables.
2.3.3 PDF management
2.3.3.1 Sioyek as PDF Viewer
Sioyek is an open-source PDF viewer focusing on technical papers with mathematical formulas. Major uses cases are coloured highlights of text sections with h shortcut, smart jump to figures by clicking on them, and bookmark text sections with shortcut b.
- Choose between portable (for isolated environment), or standard distribution under Sioyek releases
- Unzip the archive, within it, make it executable with
chmod +x. - Run it
To turn any exec into a desktop application on Ubuntu-GNOME, follow this steps:
- Relocate everything under
/opt/sioyek10. **Note that the structure of a package may not follow exactly this ofsioyek!!
## create required folders

sudo mkdir -p /opt/sioyek
sudo mkdir -p /etc/sioyek
sudo mkdir -p /usr/share/sioyek

## relocate, if not already done, the sioyek builds

### core executables
sudo cp ~/sioyek/build/sioyek /opt/sioyek/
sudo chmod +x /opt/sioyek/sioyek

### confgiuration files
sudo cp ~/sioyek/build/prefs.config /etc/sioyek/
sudo cp ~/sioyek/build/keys.config  /etc/sioyek/
sudo cp -r ~/sioyek/build/shaders /usr/share/sioyek/
sudo cp ~/sioyek/build/tutorial.pdf /usr/share/sioyek/- Add a distinctive icon, and customise the native Ubuntu launcher ‘Gnome’
sudo mkdir -p /usr/share/icons/hicolor/256x256/apps ## folder to store the siokey.png, downloaded from the web

sudo tee /usr/share/applications/sioyek.desktop > /dev/null <<'EOF'
[Desktop Entry]
Version=1.0
Type=Application
Name=Sioyek
GenericName=PDF Viewer
Comment=Fast keyboard-driven PDF viewer
Exec=/opt/sioyek/sioyek %path to the sioyek exe
Icon=sioyek
Terminal=false
Categories=Office;Viewer;
MimeType=application/pdf;
StartupNotify=true
EOF

## Refresh desktop database
sudo update-desktop-database
(Optional) Make Sioyek the default PDF viewer, using either:
- GUI method:
- Right-click any PDF
- Properties → Open With
- Select Sioyek
- Click Set as default
- or the command line:
xdg-mime default sioyek.desktop application/pdf ## to check default xdg-mime query default application/pdf- GUI method:
add to the Path, creating a symbolic link
sudo ln -s /opt/sioyek/sioyek /usr/local/bin/sioyek2.3.3.2 Sejda for editing PDFs in an interactive way
2.3.3.3 PDFtk
- To edit PDFs, if you prefer the command line.
2.3.4 Image Editors (to replace Paint on Windows)
Sorted from closest experience to Paint, to most generalist:
- Add Drawing to the
aptrepository of allowed PPAs:sudo add-apt-repository ppa:cartes/drawing - Install running
sudo apt install drawing
Libre Office DrawGimp(closer equivalent toPhotoshop):
sudo apt install gimp
sudo apt install gimp-plugin-registry ## add extensionsInkscapefor generating vectorial, and fully deformable icons
sudo apt update
sudo apt install inkscape
2.3.5 LibreOffice
Install main software (such as Libre Office Write, or Calc) with
sudo apt install libreoffice libreoffice-gtk3Relevant extensions, that you can add using
Tools -> Extensions
- Rotate Images in free text documents with Rotate extension
- Install dictionaries + extension Grammalecte and LanguageTool11. needs to check if LanguageTool is truly relevant, is AI-based, but also resource-consuming.
## French dictionary
sudo apt update
sudo apt install libreoffice-l10n-fr ## add French hyphenation- Install Latex extension
- Fonts customisation:
- Install core Windows fonts:
sudo apt update
sudo apt install ttf-mscorefonts-installer ## Install Microsoft core fonts
fc-cache -f -v ## rebuild font cache, such that the fonts now appear In Libre Office- Extra fonts installation12. Most popular fonts can be found under Every-Font GH repository:
mkdir -p ~/.local/share/fonts ## ensure personal fonts folder is created
wget -P ~/.local/share/fonts "https://raw.githubusercontent.com/serendipious/every-font/master/CenturyGothic-Italic%20-%20Century%20Gothic%20-%20Italic.ttf" ## download the original TFF files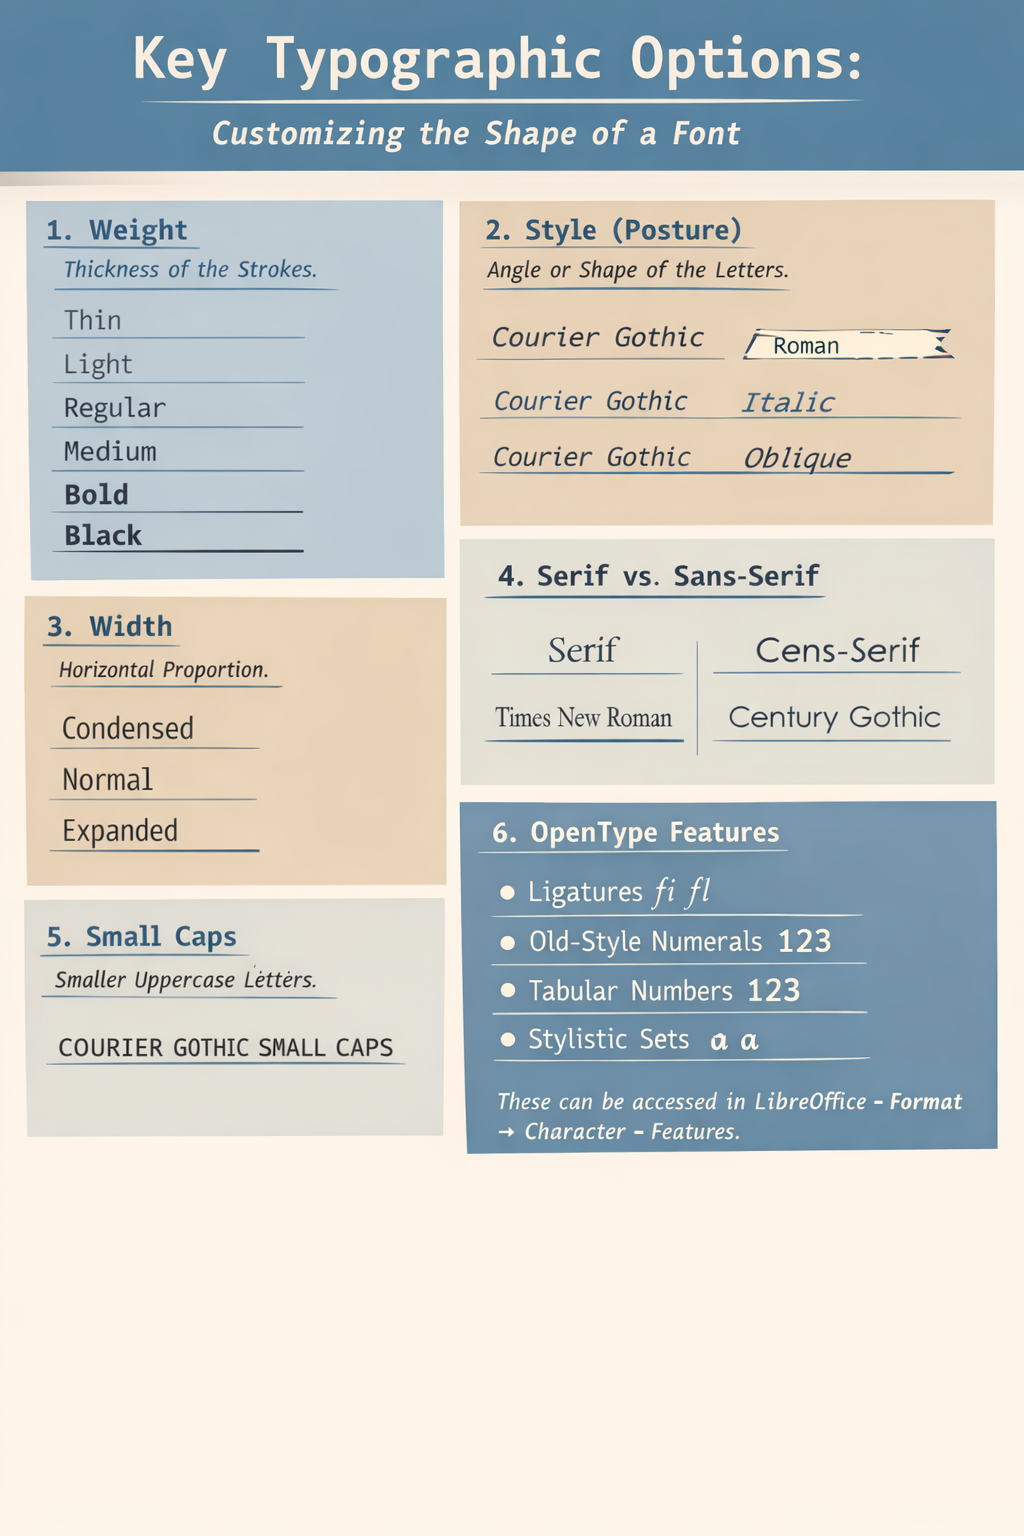
fc-cache -f -v ## update font cacheThe main stylistic variants of fonts you can play with are:
- Weight (Light, Regular, Bold, …)
- Angle or shape of the letters (regular versus italic)
- Width
- Serif vs Sans-Serif. This property is structural to a font, for instance,
Times New Romanis Serif, and
Century GothicisSans-serif. For data visualizations, or presentations,Sans-seriftypefaces are favoured, while it’s the reverse for printed documents. - Advanced font options and customisations, such as controlling for ligatures connecting two letters, can be accessed in
LibreOffice → Format → Character → Features(see Figure 2.2):
Make sure, if avalaible, to download for each font, the regular, bold, italic-bold, and italic versions at the very least.
2.3.6 Docker
- Download dependencies, configuration files and add repository to apt for automatic updates:
sudo apt update
sudo apt install ca-certificates curl ## dependencies for downloading packages, and verifying HTTPS protocols

## Part I: create, download and make Docker apt key readable for verifying its integrity
sudo install -m 0755 -d /etc/apt/keyrings
sudo curl -fsSL https://download.docker.com/linux/ubuntu/gpg -o /etc/apt/keyrings/docker.asc
sudo chmod a+r /etc/apt/keyrings/docker.asc

## Part II: define where, and which version of Docker, should be donwloaded + how to verify its integrity
sudo tee /etc/apt/sources.list.d/docker.sources <<EOF
Types: deb
URIs: https://download.docker.com/linux/ubuntu
Suites: $(. /etc/os-release && echo "${UBUNTU_CODENAME:-$VERSION_CODENAME}")
Components: stable
Signed-By: /etc/apt/keyrings/docker.asc ## folder previously defined
EOF

## Part III: update with newer configuration
sudo apt update
Install Docker toolkit with
sudo apt install docker-ce docker-ce-cli containerd.io docker-buildx-plugin docker-compose-pluginRun Docker without
sudorights for the main laptop user:
# create a Unix group allowing Docker to interact with system-level resources without admin rights
sudo groupadd docker
# and add curent user of the session to it
sudo usermod -aG docker $USER- Check installation with
sudo docker run hello-world. If not running by default upon login, enable automated start withsudo systemctl start docker. More details here.
Tutorials for Docker
2.3.7 Teams
- Use the web version, as Microsoft no longer supports .deb versions for Linux.
2.3.8 Web browsers
2.3.8.1 Firefox
Avoid running directly
sudo apt install firefox-> it installs by defaultsnapd, and will use not stable, betaSnapversion of Firefox.
- Import, and add Mozilla APT signing key:
## Download APT key
wget -q https://packages.mozilla.org/apt/repo-signing-key.gpg -O- | sudo tee /etc/apt/keyrings/packages.mozilla.org.asc > /dev/null

## Add it to the Apt registry
cat <<EOF | sudo tee /etc/apt/sources.list.d/mozilla.sources
Types: deb
URIs: https://packages.mozilla.org/apt
Suites: mozilla
Components: main
Signed-By: /etc/apt/keyrings/packages.mozilla.org.asc
EOF

## Provide higher priority to Mozilla Firefox

echo '
Package: *
Pin: origin packages.mozilla.org
Pin-Priority: 1000
' | sudo tee /etc/apt/preferences.d/mozilla- Install Firefox using Mozilla provider:
sudo apt update
sudo apt install firefox

which firefox ## should not report `snapd` folder
apt policy firefox
2.3.8.2 Google Chrome
- Install Google Chrome, by downloading the .deb archive, then run it:
sudo apt install google-chrome-stable_current_amd64.deb`- Download, and add Google Chrome APT signing key, for automatic updates:
## Download APT key
wget -q -O - https://dl.google.com/linux/linux_signing_key.pub | sudo gpg --dearmor -o /usr/share/keyrings/google-linux-signing-key.gpg

## Add it to the Apt registry
echo "deb [arch=amd64 signed-by=/usr/share/keyrings/google-linux-signing-key.gpg] http://dl.google.com/linux/chrome/deb/ stable main" | sudo tee /etc/apt/sources.list.d/google-chrome.list

## Update to the most recent version
sudo apt update- add the Grammarly Chrome plug-in extension for automatic checking of the spelling, and grammar (choose one specific regional English, and stick to it)
2.3.9 Slack
- Download Slack application
- Run it with
sudo apt install slack-desktop-4.47.69-amd64.deb - Update with:
sudo apt-get update
sudo apt-get upgrade slack-desktop
2.3.10 Zulip
- Run following instructions:
sudo apt install curl ## if not already installed
sudo curl -fL -o /etc/apt/trusted.gpg.d/zulip-desktop.asc \
    https://download.zulip.com/desktop/apt/zulip-desktop.asc
echo "deb https://download.zulip.com/desktop/apt stable main" | \
    sudo tee /etc/apt/sources.list.d/zulip-desktop.list
sudo apt update
sudo apt install zulip- Log-in (recommended with your Github profile) on each of the channels you want to connect, to keep notified about newest posts.
2.3.11 Cytoscape
Major default: only supported by Java version 17 (and not by more recent, and stable Java versions!!)
- Retrieve the latest version
- Make it executable with
chmod u+x <filename.sh> - Run with
bash <filename.sh> - Launch with
Cytoscape &.
2.3.12 Zotero
sudo apt install libreoffice-java-common -yadds Java dependencies to seamlessly integrate Zotero with Libre Office plug-in (for instance, automated retrieval of bibliographic references).Retrieve the latest stable version on https://www.zotero.org/download/14.
Run following instructions + Synchronise by installing Zotero Connector on your website:
#!/bin/bash

## part I: extract archive
sudo tar -xjf zotero.tar.bz2 -C /opt
sudo mv /opt/Zotero_linux-x86_64 /opt/zotero

## Part II: add the executable
sudo ln -s /opt/zotero/zotero /usr/local/bin/zotero- (Optional: add a custom Desktop, and launcher icon for an executable) Create file
~/.local/share/applications/zotero.desktop, with the following content. Make the launcher executable withchmod +x ~/.local/share/applications/zotero.desktop
[Desktop Entry]
Name=Zotero
Exec=/usr/local/bin/zotero
Icon=/opt/zotero/icons/icon128.png
StartupWMClass=Zotero
Type=Application
Terminal=false
Categories=Office;
MimeType=text/plain;x-scheme-handler/zotero;application/x-research-info-systems;text/x-research-info-systems;text/ris;application/x-endnote-refer;application/x-inst-for-Scientific-info;application/mods+xml;application/rdf+xml;application/x-bibtex;text/x-bibtex;application/marc;application/vnd.citationstyles.style+xml
X-GNOME-SingleWindow=true- Inspired from Zotero hacks tutorial, enable unlimited synced storage for articles on multiple machines.
- Add required plug-ins,
Better BibTeX(mandatory for custom expert as a plain .bib file) +Zotmoov, which replaces previous extensionZotfilefor classifying articles per author’s name. - Edit Zotero preferences15: - Uncheck the option to create automatic web page snapshots (increases cluttering with lots of small files added) - Uncheck full-text sync - Set apart in
Edit->Settings->Advancedthe- Base directory (should be the folder synced by your File sharing software), with
- Custom Data directory location. This local folder should be located in a different position, and will be managed by Zotero itself
- Edit
Better BixTexplug-in: - Personally, use[auth:lower][year][journal:lower:abbr]- Should be the same across machines.
2.3.13 Quarto, R and RStudio
2.3.13.1 R, and recommended packages
- To get the latest R Versions, add the signing key, along with the repository:
sudo mkdir -p /etc/apt/keyrings
sudo wget -O /etc/apt/keyrings/cran.gpg https://cloud.r-project.org/bin/linux/ubuntu/marutter_pubkey.asc
echo "deb [signed-by=/etc/apt/keyrings/cran.gpg] https://cloud.r-project.org/bin/linux/ubuntu jammy-cran40/" | sudo tee /etc/apt/sources.list.d/cran.list- Install R:
- Install basic dependencies
sudo apt update
sudo apt install r-base r-base-dev -y
R --version- Install recommended Ubuntu system libraries for scientific computing and/or connection:
## Compilation tool
sudo apt install cmake

Network, imaging, and plotting libraries
sudo apt install \
build-essential \
libpng-dev \
libjpeg-dev \
libtiff-dev \
libcairo2-dev \
libcurl4-openssl-dev \
libssl-dev \
libxml2-dev \
zlib1g-dev

## scientificic libraries
sudo apt install \
  build-essential \
  gfortran \
  libblas-dev \
  liblapack-dev \
  libgsl-dev
- Configure default CRAN mirror.
- default choice is https://cloud.r-project.org, as the official CRAN miror, and the most up-to-date
- For Ubuntu, the Posit Package Manager mirror, by providing prebuilt Linux binaries, is much faster to compile. To install it, modify the local
~/.Rprofilefile:
echo 'options(repos = c(CRAN = "https://packagemanager.posit.co/cran/__linux__/<ubuntu-version>/latest"))' >> ~/.Rprofile- Install your packages, by organising them as a package repository with dependencies. Notably, install those of Stephen Turner, as essential to most bioinformatic pipelines:
remotes::install_github("stephenturner/Tverse", upgrade=TRUE).
2.3.13.2 RStudio (Desktop IDE)
- Go to: https://www.rstudio.com/products/rstudio/download/#download/ Choose the Ubuntu/Debian
.debpackage for your architecture (amd64). - Install the
.debpackage:
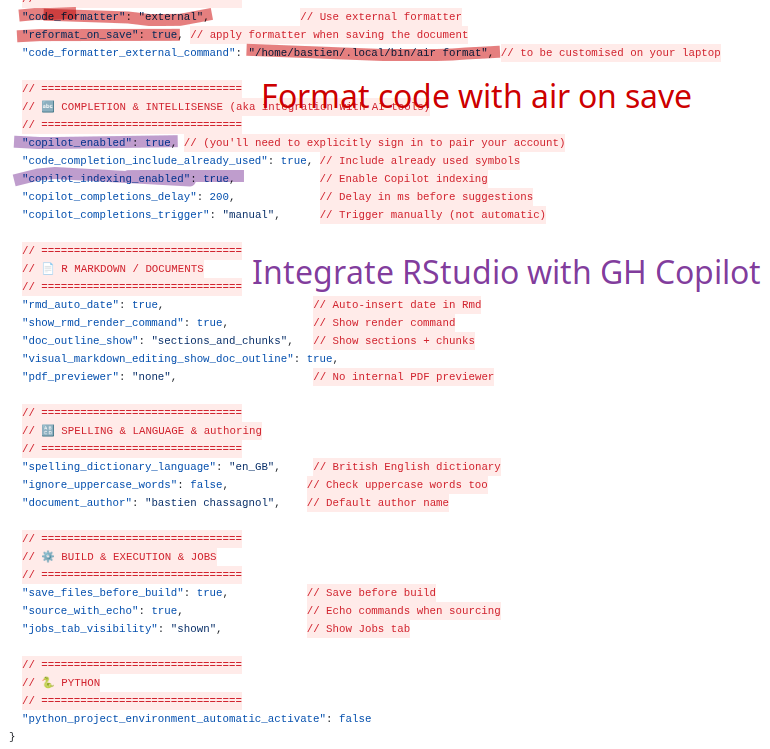
sudo apt install ./rstudio-2025.09.0-422-amd64.deb- Install Air, as the recommended, fast and modern formatter for R code. Then, customise your RStudio settings, explicitly reporting the path location of Air formatter, see Tip 2.2.
uv tool install air-formatter- Locate the repository on your system that stores RStudio settings. There’s no direct means for exporting RStudio parameters that have been modified by the user. Instead, the key directory storing core RStudio settings is located under
~/.config/rstudio/for Linux, and%AppData%\RStudiofor Windows16. The key files in this repository are:
| File | Purpose |
|---|---|
rstudio-prefs.json |
Global preferences modified by the user |
keybindings/ |
Custom keyboard shortcuts |
themes/ |
Custom themes (if any) |
snippets/ |
Code snippets |
dictionaries/ |
Custom dictionaries beyond English, and French |
Identify what it’s worth relevant for syncing: indeed, while you could export all the RStudio settings for a complete backup, most of them are optional, or barely modified by regular users. Instead, I would identify, and retrieve only the settings explicitly changed by the user. > Would use local, or online diff editors, such as diffcheckers to quickly identify what changed between personal configurations. > Specifically, all external tools that complement the functionalities of RStudio, such as pdf previewer, or external formatters such as Air, are hard-coded as absolute paths, and are accordingly highly specific to a personal laptop.
Homogenise settings across machines: once you’ve finalised the customisation of the RStudio settings to your specific OS configuration, simply overwrite pre-existing user-specific settings file
rstudio-prefs.json. Restart RStudio to check if changes were properly integrated into the graphical interface17.
To simplify the syncing across machines (especially for teams with shared computing environment), use either: 1. Git-based sync, storing your dotfiles. This is the recommended approach. You can find my settings files under
rstudio-prefs.json. See also Figure 2.3 for a more comprehensive explantion of core changes brought to a default, native RStudio configuration. 2. use symbolic links, or cloud sync (but you have fewer options to adjust for changes)
Air Posit, and integration with AI helpers.Controversial claim: use VScode for R development if working inside a Docker container, or on a server that does not provide a RStudio interface, otherwise, it’s overkilled. Notably, for R package development, that should be containerised, RStudio is way more flexible
2.3.13.3 Quarto
sudo apt install ./quarto-1.3.496-linux-amd64.deb
quarto check
\[ a = 10 \]
2.3.13.4 Cursor with R
- Install the following R packages:
install.packages("remotes")
library(languageserver)
library(rmarkdown)
library(vscDebugger)
library(httpgd)
(optional, but recommended) Use
radianas enhanced R terminal withuv tool install radianInstall the
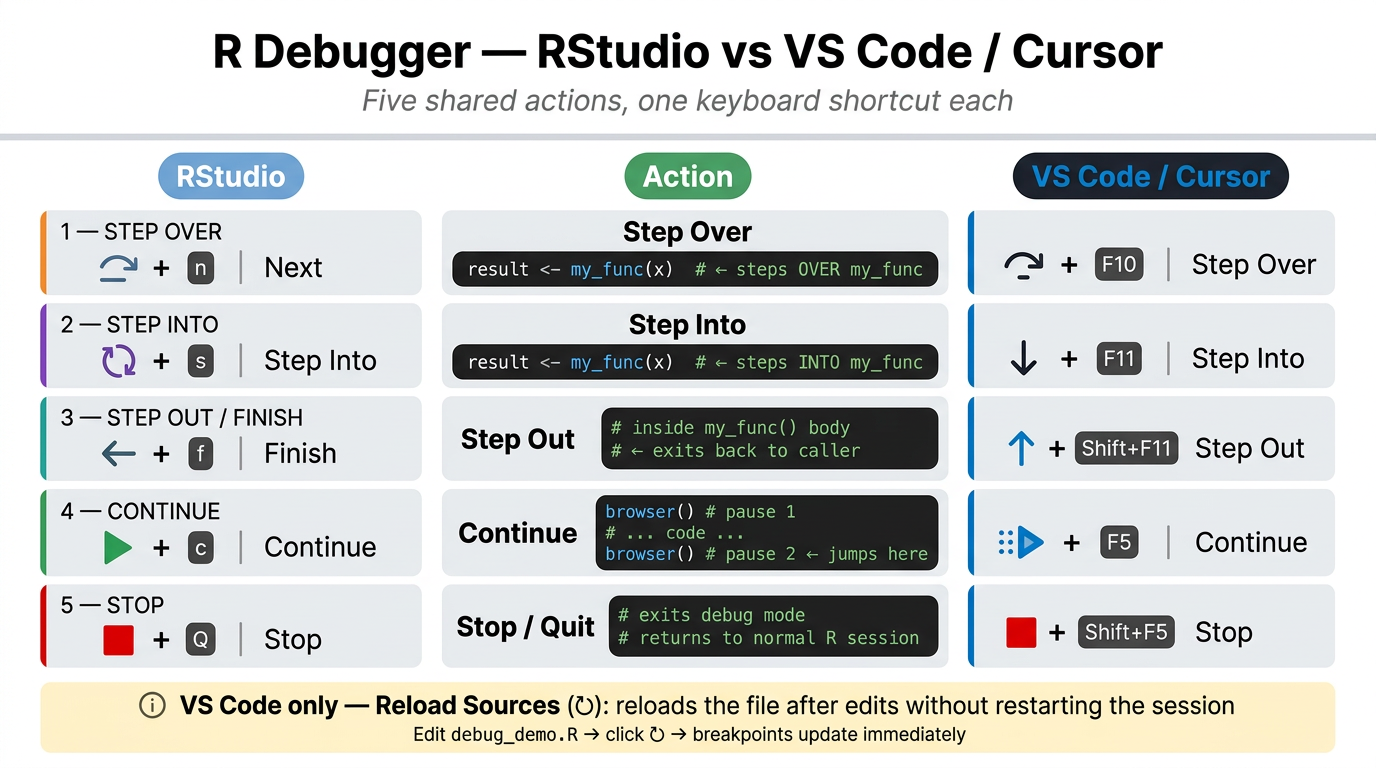
vscDebuggerextension for VS Code, and run the debug demo script to test it.
2.3.14 Python
From PEP 668. guidelines, applied to modern Debian/Ubuntu distributions with native Python installed above the
3.11/3.12version,pipis prevented from modifying the system Python as it could interfere with te core installation programapt.
This section is certainly the most controversial of this whole Ubuntu tutorial, as guidelines for a modern programmatic use of Python evolve rapidly, without reaching a full agreement
2.3.14.1 Python tools
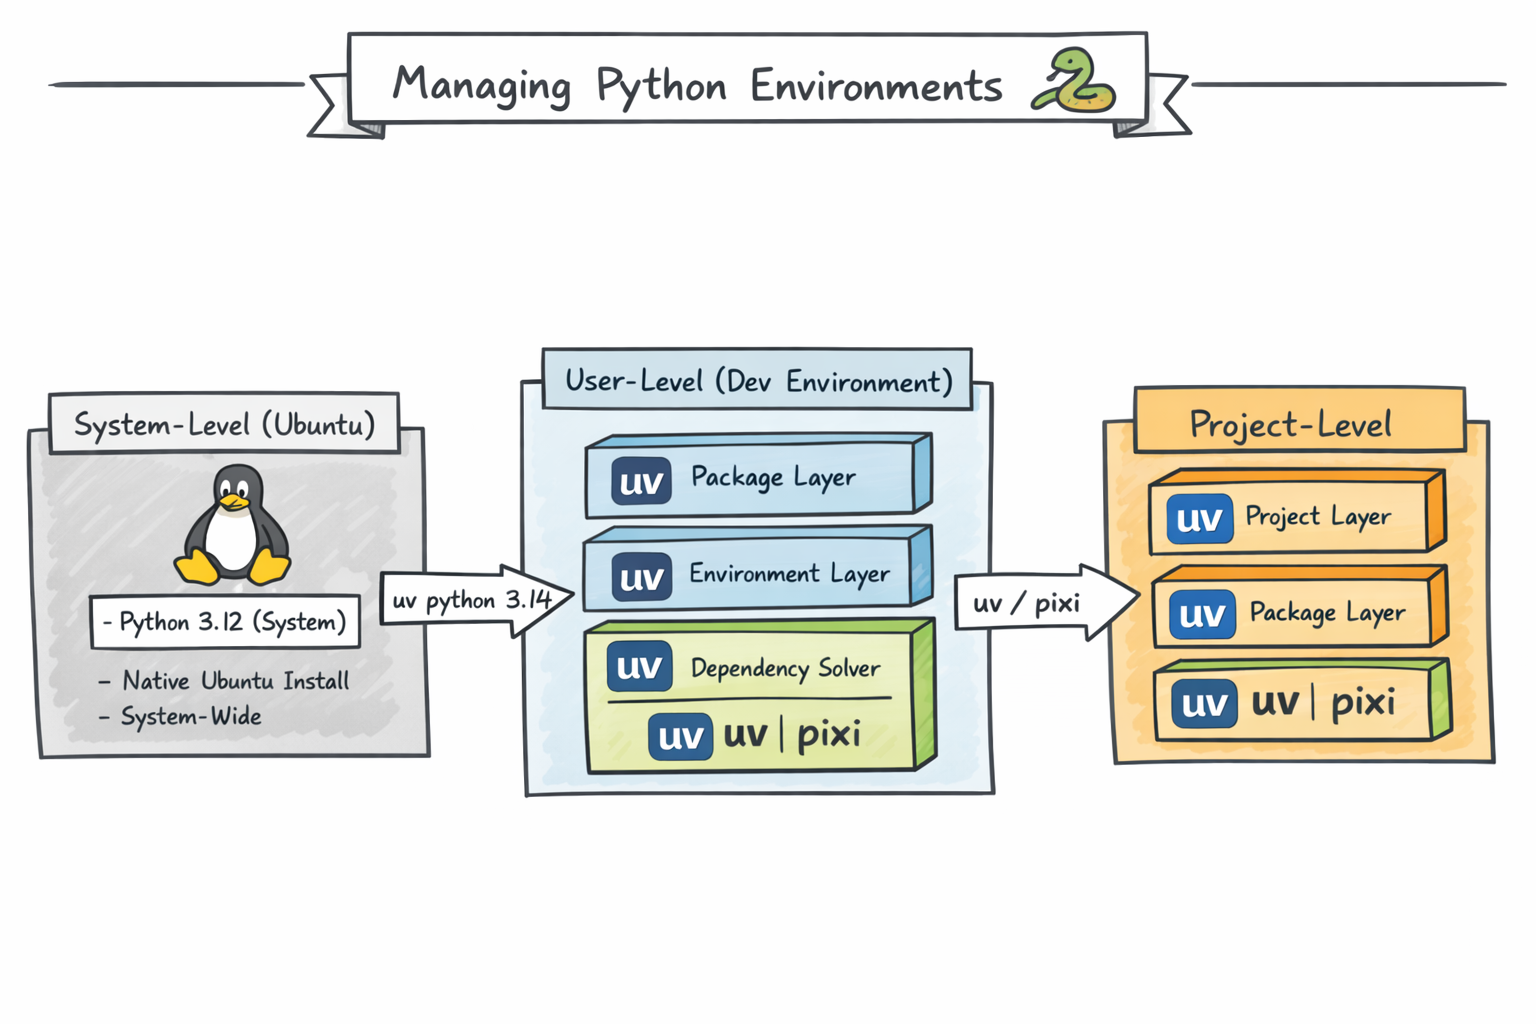
- The latest versions of Ubuntu, including
Noble, strongly deter from installing system-wide versions of recent Python packages. In other words, avoid runningsudo apt install python3.14-full, and updating Deadsnakes PPA. uvfully replaces the functionalities and features brought by a variety of slower, standalone Python tools (pip,poetry,virtualenv,pipx, …), providing a faster, versatile and unified framework, see Figure 2.5. The features provided bypoetryfor package development may still not be fully covered byuv, andpipremains the legacy solution in older HPC systems:
/usr/bin ### Pre-installed Ubuntu system
 └── system Python (used by OS)

uv
 ├── managed Python versions
 ├── CLI tools (black, ruff, jupyterlab)
 └── project environments

~/.local/share/uv/python/
├── python3.14conda, and evenmambahave been outdated bypixifor multi-language projects.uvis definitely the go-to solution for Python-centric projects, but does not support yet cross-language project managements. Of note,uvnatively enforces the use of virtual environments when running Python scripts, see Table 2.3.- The field renews fast -> stay alert, and up-to-date to the latest trends in this tech world.
| Feature | uv | Poetry | Pixi |
|---|---|---|---|
| Speed | ⭐⭐⭐⭐ | ⭐⭐ | ⭐⭐⭐ |
| Dependency management | ✓ | ✓ | ✓ |
| Virtual environments | ✓ | ✓ | ✓ |
| Python version install | ✓ | ✗ | ✓ |
| Package publishing | ⚠ Acceptable | ⭐ Best | ⚠ Limited |
| Non-Python dependencies | ✗ | ✗ | ✓ |
| CI performance | ⭐⭐⭐⭐ | ⭐⭐ | ⭐⭐⭐ |
| Maturity | Medium | High | Medium |

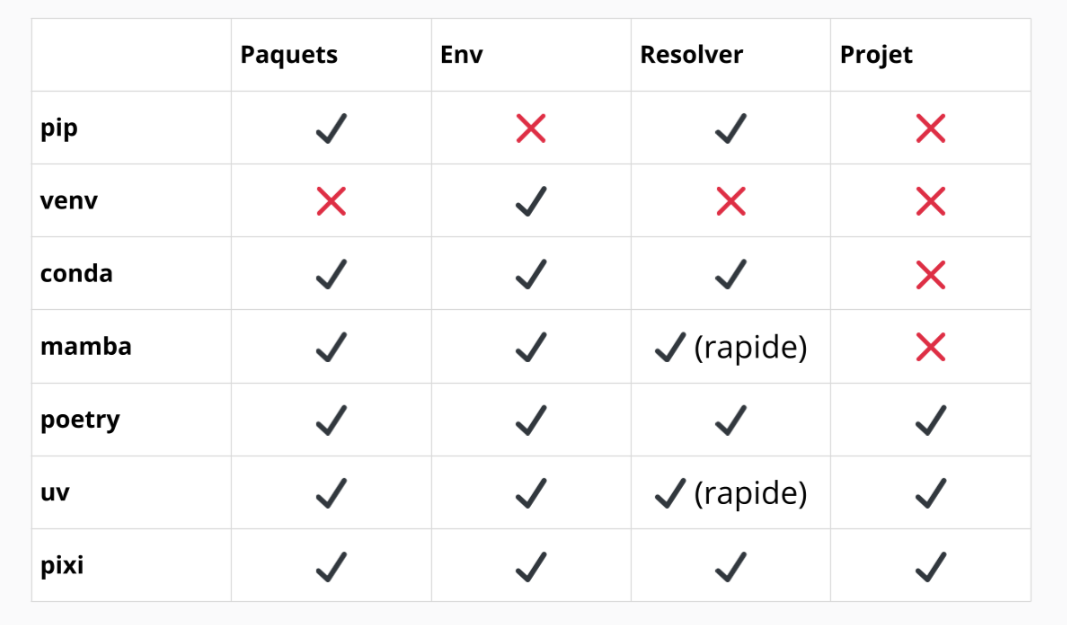
uv supersedes them all.

uv.
uv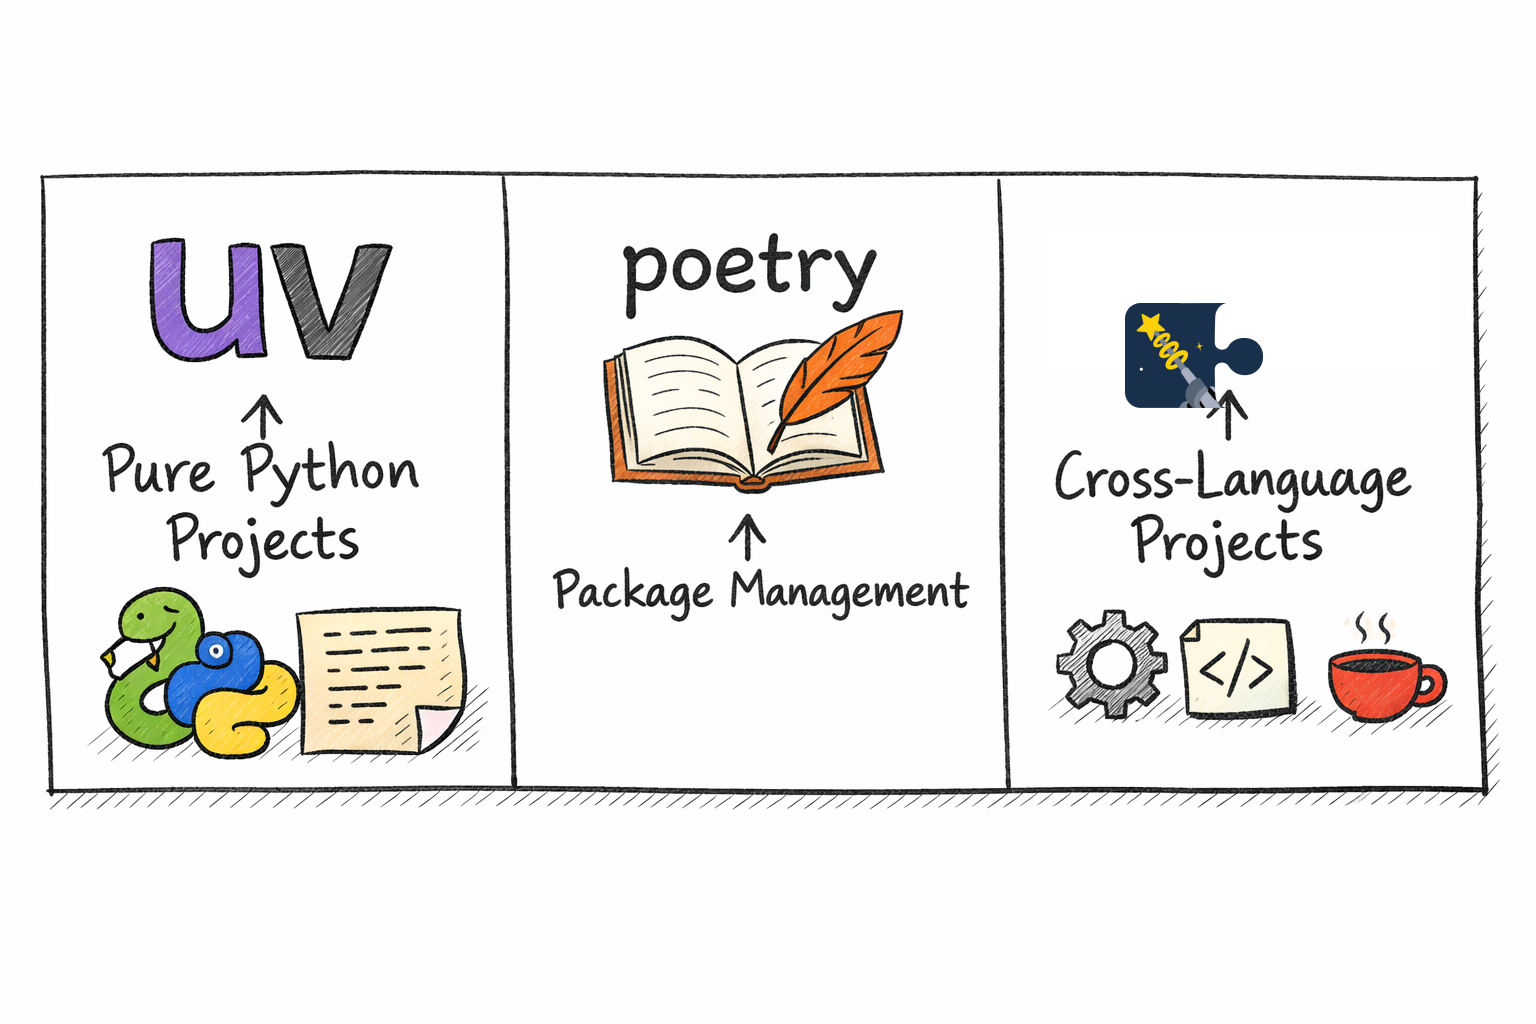
uv for pure Python projects (for instance, running bioinformatic analyses), poetry (and uv with less support) for Python packages, and pixi for cross-language projects. **Note that both conda and mamba ar eno longer required in the modern Programmer stack.2.3.14.2 One Tool to bring them all and in the jungle of Python tool, bind them all: a uv story plot
I now describe the core steps to use the latest stable Python version (currently, 3.14), without breaking core Linux dependencies using pre-installed Python version.
- Install
uvwith the following command:curl -LsSf https://astral.sh/uv/install.sh | sh. - Install latest Python version with
uv:uv python install 3.14. - Two configuration levels for setting up the Python version
- At the project level, run
uv python pin 3.14. - At the user level:
bash cd ~ echo "3.14" > ~/.python-version
- Use
uvinstead ofpipxto install core Python tools for package dependency, web IDEs, modern Python formatting and styling, …. Aspipx, all these tools are automatically added to the user’sPATH:
uv tool install ruff ## ~ equivalent to pipx install ruff
uv tool install "dvc[ssh]" # recommended data management tool, and versining, if exceedging git-lfs
uv tool install black
uv tool install jupyterlab ## `JupyterLab` outdates previous `JupterNotebook` as a web-based, and user-friendly interface
uv tool install ipython
uv tool install pre-commit
uv tool install poetry
uv tool install cookiecutter `Cookiecutter` generates Python templates for modern packaging. - Check integrity of system Python:
ls /usr/bin/python* ## -> ## only one version expected, Python 3.12 with modern Linux
/usr/bin/python3.12- Check version used by
uv:
ls -la ~/.local/share/uv/python* ## path returned should be located within the HOME directoryChecking current Python version used:
From the terminal (system-wide),
ls -d /usr/lib/python3.*, orwhich -a pythonshould only return a unique version of Python, the one used by Ubuntu.From a Python shell (including Jupyter Lab):
import sys
print(sys.version)
print(sys.executable)
print(sys.path)
Relevant sources for Python tools
2.3.14.3 Marimo to replace Jupyter-Lab
- Install Marimo, including commonly used tools: duckdb (SQL cells), polars/pyarrow (SQL output), ruff (formatting), vegafusion (charts)
uv tool install "marimo[recommended]"

# Verify
marimo --version- Add Cursor/VS Code extension:
cursor --install-extension marimo-team.vscode-marimo- Commonly used keybindings to be added:
  // --- 🌊 Marimo ---
  // Open current .py file as a marimo notebook in the editor
  {
    "key": "ctrl+alt+m",
    "command": "marimo.openNotebook",
    "when": "resourceExtname == '.py'"
  },
  // Create a new sandboxed marimo notebook via terminal
  {
    "key": "ctrl+alt+shift+m",
    "command": "workbench.action.terminal.sendSequence",
    "args": { "text": "uvx marimo edit --sandbox \n" }
  },
  // Run current marimo notebook as a read-only app
  {
    "key": "ctrl+alt+r",
    "command": "workbench.action.terminal.sendSequence",
    "when": "resourceExtname == '.py'",
    "args": { "text": "uvx marimo run '${file}'\n" }
}- Interactive example is provided in demo.py.
2.3.15 Nextflow as workflow management tool
Installation process as standalone, and automatically up-to-date tool. µµCheck first that Java version at least 17 is installed, see Section 2.3.11:
curl -s https://get.nextflow.io | bash
chmod +x nextflow # make nextflow executable

# move nextflow into execubtale path
sudo mv nextflow $HOME/.local/bin/
2.3.16 Latex
sudo apt install texlive-full -y
## other commonly used packages
sudo apt install texlive-latex-extra texlive-fonts-recommended texlive-science biber latexmk -y
2.3.17 WhatsApp
- No supported local Linux installation
- Instead, recommended to use the Web version of WhatsApp, then pair it with your mobile device.
2.3.18 Cursor
- Download DEB extension.
- Run it:
sudo apt install ./cursor_2.0.77_amd64.deb- Sync your Cursor configuration across devices, see Tip 2.3:
- Export the core settings:
i.  Open Command Palette (`Ctrl/Cmd + Shift + P`), then search: **“Preferences: Open Settings (JSON)”**
ii. Export the file in your new device
iii. Default Linux installation: `~/.config/Cursor/User/settings.json`- Export the keybinding shortcuts:
- Open: “Preferences: Open Keyboard Shortcuts (JSON)”
- Export
keybindings.jsoninto your local folder:~/.config/Cursor/User/keybindings.json
- (the main difference with VSCode). Contrary to
VSCode, you need to export the list of extensions manually:
- Retrieve the list of extensions running
cursor --list-extensions > extensions.txt - Install them back with:
grep -v '^\s*#' "~/.config/Cursor/User/extensions.txt" \
| grep -v '^\s*$' \
| xargs -I{} cursor --install-extension {}- The whole list of extensions, and Cursor settings are available under the Cursor config folder.
More details are provide in Sync Cursor Settings the Dotfiles Way website, including the symlink commands tu fully automate this process
The harcore way, for syncing configuration files across numerous users, cf Benjamin, and Cursor Config Sync
2.3.19 Password Manager for Linux -> BitWarden
`BitWarden is the recommended password manager for Linux systems for a variety of reasons: it’s mostly free, compliant with most web browsers (Firefox, Chrome, Opera, …), including native Google password manager, and can sync your password database over an endless number of devices. There’s even a lightweight application for Iphone, and Android mobile phones. Besides, the storage expends beyond raw passwords, ranging from passkeys, to SSH secrets, or credit card information. Finally, it’s compatible with most OS, including Windows and Linux.
Accordingly, all these features fax expand the facilities delivered by native Ubuntu Gnome
Passwords and Keysapplication manager, which besides can only be installed locally.
One major drawback, though, is that it does not check for duplicated values in an automated way.
Follow the following steps for its installation18
## Install Flatpak, and Gnome Flatpak plugin
sudo apt install flatpak
sudo apt install gnome-software-plugin-flatpak

## Add Flatbu repository for software storage
flatpak remote-add --if-not-exists flathub https://dl.flathub.org/repo/flathub.flatpakrepo

## Install and run BitWarden locally
flatpak install flathub com.bitwarden.desktop
flatpak run com.bitwarden.desktop

## Install Web Add-on, going to https://chromewebstore.google.com/detail/bitwarden-password-manage/nngceckbapebfimnlniiiahkandclblb?hl=en, then pin in your Booktabs

## Export, then import your password database from other web browsers
In the
Auto-filltab of the Parameters configuration, leave unticked the optionDo not auto-fill on page load+ chooseDefault URI detectionoption asExactto avoid ambiguities. Counterintuitively, go to Web Vault BitWarden to bulk remove passwords. This option is not proposed by default in the regular BitWarden.
2.4 Core numerical tools provided by AMU
List of numerical tools used in Amu
2.4.1 AMUZoom
- Retrieve latest version, choosing proper Linux distributions and OS architecture under Zoom downloads. Also avalaible online. Strongly recommended to install Zoom locally.
- Run
sudo apt install ./zoom_amd64.deb - Log-in using your university email address, using
SSO. The account is provided with unlimited meetings available by default, use following domain:univ-amu-fr. 19
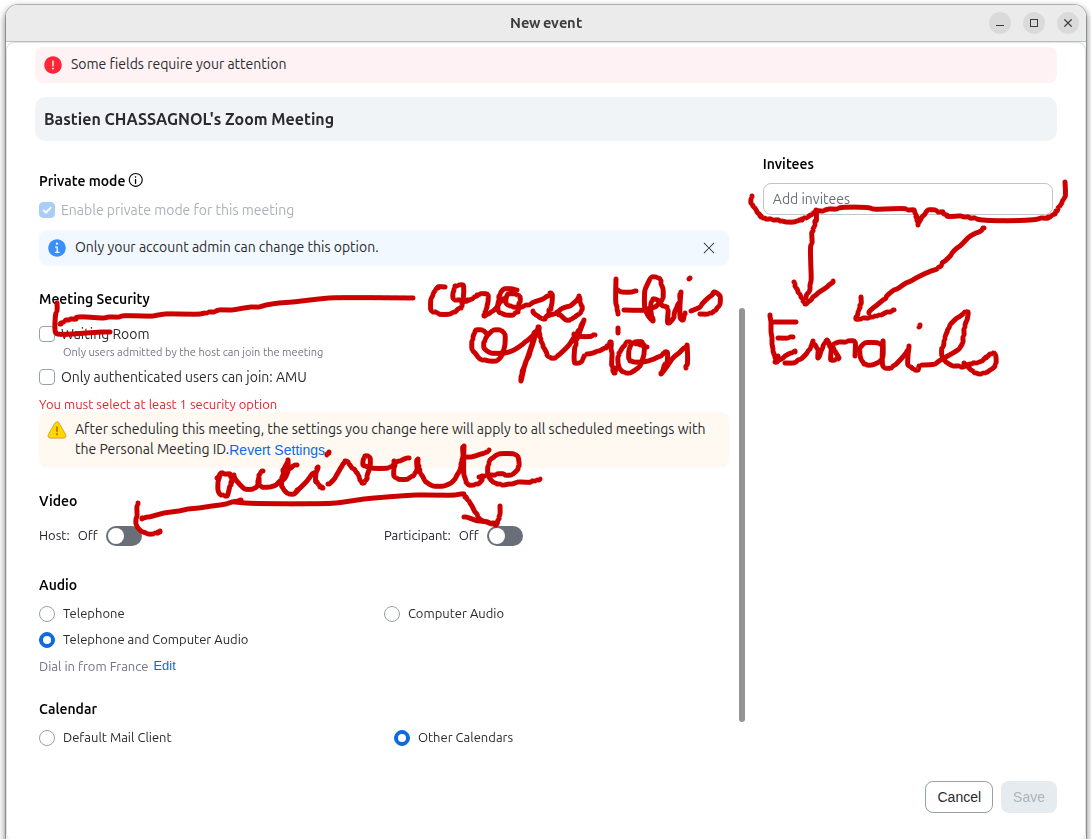
2 elements, listed below, to keep in in mind, when creating a Zoom meeting to enable any external user, with the password, to ling-in, and share its screen, see Figure 2.6:
To go further, check the following online resources:
2.4.2 WooClap for QCMs
Go to Wooclap, and use your instutional mail adress for single sign-on across platforms.
2.5 Working with a remote server
id ${USER}
uid=1001(bastien) gid=1001(bastien) groups=1001(bastien),4(adm),24(cdrom),27(sudo),30(dip),46(plugdev),122(lpadmin),135(lxd),136(sambashare)- list of groups on the server, identify is defined by the combination of an username,
UID(user ID), andGID(group ID) on both servers.
id ${USER}
uid=1007(bastienc) gid=1007(bastienc) groupes=1007(bastienc),1043(dtoo_project)
More information avalaible under Server Management tutorial.
2.5.1 Starting configuration
# ~/.bashrc (minimal and robust)
# Local user binaries first
export PATH="$HOME/.local/bin:$PATH"
export PATH="$PATH:$HOME/scripts/tools"
# Auto-switch interactive Bash sessions to user-local Zsh
if [ -x "$HOME/.local/bin/zsh" ] && [ -n "$PS1" ] && [ -z "$ZSH_VERSION" ]; then
exec "$HOME/.local/bin/zsh" -l
fi
# -------------------------------------------------------------------
# Dotfiles migration via SCP (run these on your LOCAL machine)
# -------------------------------------------------------------------
# 1) Create target directories on server
# ssh mmg-server 'mkdir -p ~/.ssh'
# 2) Copy core dotfiles
# scp ~/.bashrc ~/.gitconfig mmg-server:~/
# 3) Copy SSH config
# scp ~/.ssh/config mmg-server:~/.ssh/config
# 4) Secure SSH permissions on server
# ssh mmg-server 'chmod 700 ~/.ssh && chmod 600 ~/.ssh/config'
# Optional: copy SSH keys (only if you explicitly want this)
# scp ~/.ssh/id_ed25519 ~/.ssh/id_ed25519.pub mmg-server:~/.ssh/
# ssh mmg-server 'chmod 600 ~/.ssh/id_ed25519 && chmod 644 ~/.ssh/id_ed25519.pub'
``
### SSH configuration
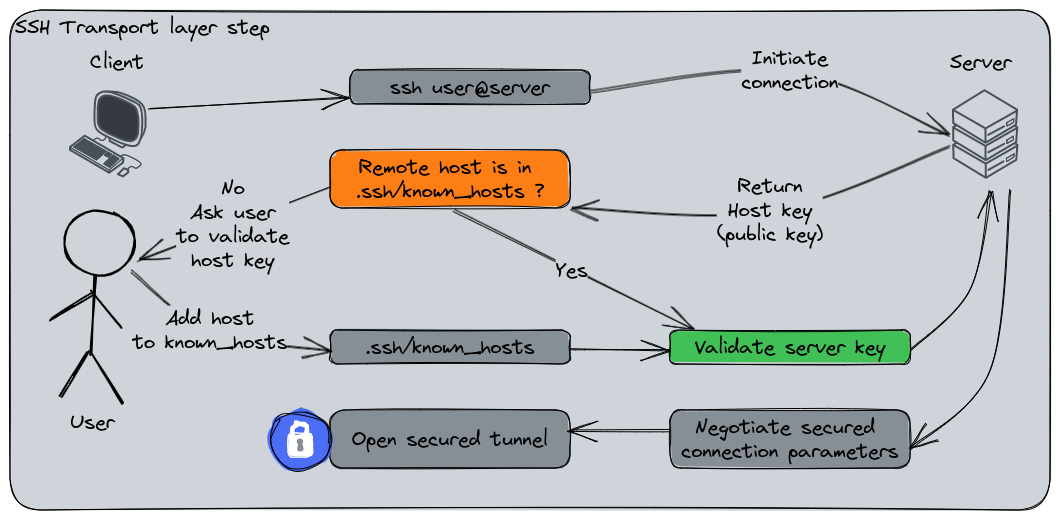
> Objective is dual: avoid typing your password each time you're connecting to a remote cluster, and keep a safe storage of all registered remote hosts:
1. 🔐 Set up SSH remote access (with key-based auth)
``` bash
## remote server must have openssh-server installed
sudo apt install openssh-server- Generate a pair of public-private SSH key on your local machine20
ssh-keygen -t ed25519 -C "your_email@example.com"This creates:
- `~/.ssh/id_ed25519` (private key)
- `~/.ssh/id_ed25519.pub` (public key)
Copy your key to the server with
ssh-copy-id username@server_ip. You’ll no longer need typing your password once typed once.(Optional) Keep under
~/.ssh/configfile the key features describing each remote cluster. For instance, my configuration for the IFB is the following, and to connect to it, I only need typing nowssh ifb-core. A second advantage of using this format for storing hosts is that it can be readily used byVS Code SSH Remoteconnection extensions.
## 🎯 alias for the host connection, either "ifb-core" or "ifb"
Host ifb-core ifb

  ## 🌍 The real hostname (or IP) of the remote server
  HostName core.cluster.france-bioinformatique.fr

  ## 👤 Username used on the remote machine
  User bchassagnol

  ## 🔑 Path to your private SSH key
  IdentityFile ~/.ssh/id_ed25519

  ## 🚫 Force SSH to use ONLY the specified key above, avoiding complex managing of key version
  IdentitiesOnly yes

  ## 🔄 Order of authentication methods: SSH key, then keyboard-interactive, then fallback to password
  PreferredAuthentications publickey,keyboard-interactive,password

  ## 🤖 Automatically add this key to ssh-agent when used
  AddKeysToAgent yes

# Host configuration for the new server
Host mmg-sb-05 new-mmg-cluster
HostName 139.124.156.52
Port 22218 # is the port, avoiding, unlike the popular 22, to be hacked.
User bastienc
IdentityFile ~/.ssh/id_ed25519
IdentitiesOnly yes
PubkeyAuthentication yes
PreferredAuthentications publickey,keyboard-interactive,password
AddKeysToAgent yes
ForwardX11 yes
ForwardX11Trusted yes
My host configuration, enabling by default graphical interfaces to run on the remote server, is avalaible under config-ssh
On older Ubuntu configurations, the
shh-agent, andshh-addprocesses are not activated by default on startup. Check this by runningsystemctl --user enable ssh-agent.
Report to Table 2.4, and Figure 2.7 for further details
| Practice | Why |
|---|---|
| Prefer Ed25519 keys | Small, fast, modern default. |
| Use a pass phrase on the key | Protects the key if the disk is copied or stolen. |
~/.ssh/config per host |
Aliases, and login recommendations |
| Never commit private keys | Keep id_* out of git and cloud-synced folders. |
ssh-copy-id once per host |
Standard way to populate authorized_keys. |
| Option | Purpose | Effect on X11 |
|---|---|---|
-X |
X11 forwarding (untrusted) | Runs GUI apps remotely |
-Y |
X11 forwarding (trusted) | Runs all GUI apps remotely |
-C |
Compression | Reduces network usage and can speed up GUI over slow connections |
sshconnexion
2.5.2 MMG cluster, and recommendations for project management
About projects timeline, and structure, follow these tips as soon as collaboration is involved:
- Initiate
git + githubat the real start up of the project - Use only the
/mnt/<cluster-name>/projects/folder (no projects in your home, except for a quick run, and test) - When creating the project, set carefully group and user permissions, following guidlines of document https://github.com/BAUDOTlab/teaching_material/blob/main/Server%20Management/Server_Management.pdf, section Creating a New Project
- Complement the
README.md(to be created) at the root of the folder, with one short line per directory in theprojectsfolder quickly summarising the overarching objective of the study
~/remote_project –>
Upon my recent transition from the Windows world to Linux, and huge frustration resulting from spending a lot of time recovering tutorials and disseminated configuration files when configuring a new laptop, here’s my detailed tutorial about best practices when starting from fresh on a Ubuntu session: https://baudotlab.github.io/teaching_material/Linux/installation-linux.html (and GH repo: https://github.com/BAUDOTlab/teaching_material) Beyond key commands, I distil some tips to enhance reproducibility across projects, provide default configuration tools for Git, RStudio and VS Code, and suggest software to replace the paying licence of the Office ecosystem. I also tried to concatenate recommendations from the team, including Benjamin, Morgane, Marielle, and philippe notably.
Besides, here are the 3 development guidelines that after discussions with Benjamin, might be the msot controversial, but strongly suggest nonetheless:
No further support of RServer, nor JupyterLab on the server -> with VS Code, and its extension “Visual Studio Code Remote - SSH”, it’s easy to automatically retrieve back its local programming framework
- For Python, switch to VS Code (or Cursor for AI-guided development):
Spyderis slow, and old-looking,Jupyter Notebooksis not reproducible (and limited in functionalities), especially witht he advent of Marimo: https://marimo.io/,PyCharm, while offering a slightly better developer experience, has a paying licence that limits its functionalities + all its features are covered by VS Code extensions - For R,
RStudiois definitely the best (to quote Benjamin, “that’s the utmost shame that the best IDE had been developed for the worst programming language”). But running it on the server implies strong latency -> suggested workflow: develop, and run your scripts on small examples locally, then scale them on larger datasets using VS Code on the server (or the command line)
- For Python, switch to VS Code (or Cursor for AI-guided development):
Use
uvfor Python-full projects,uvorpoetryfor Python package development, andpixifor multi-language projects (see why in following caricature) -> especially, bothcondaandmambaare heavy, and way too slowAbout projects timeline, and structure, follow these tips as soon as collaboration is invovled:
- Initiate
git + githubat the real start up of the project - Use only the
/mnt/<cluster-name>/projects/folder (no projects in your home, except for a quick run, and test) - When creating the project, set carefully group and user permissions, following guidlines of document https://github.com/BAUDOTlab/teaching_material/blob/main/Server%20Management/Server_Management.pdf, section Creating a New Project
- Complement the
README.md(to be created) at the root of the folder, with one short line per directory in theprojectsfolder quickly summarising the overarching objective of the study
- Initiate
Finally, if you: - Want to collaborate to the tutorial: favour quarto (or notebooks) editable files over PDFs, index your document under https://github.com/BAUDOTlab/teaching_material/blob/main/_quarto.yml. You can also report issues directly on the website, clicking on the option “Edit this page” in the footer - For computational nerds, or people generally interested in best programming guidelines, solving computational and dependency nightmares, or simply curious, add a like to this comment -> I’ll add a Slack channel to unify debates, and troubleshoot issue solving :-)
Returns
amd64in my case↩︎Alternatively, you can rely on the GNOME Interface,
Wifisection↩︎Note that Comments must be placed in separated lines, not inline.↩︎
Accept as EOL CRLF, but always commit as LF↩︎
constrain commits to be encoded and pushed as
LF↩︎apt-getworks similarly, but is now deprecated↩︎Fetch the latest stable archive, extract it, and add executables to your
PATH, see example under Section 2.3.12↩︎Time-out units are reported in seconds, accordingly, this amounts to one hour↩︎
default repo for third-party apps, preventing conflicts with distributed, native packages↩︎
You may configure the Java version used by default under
Tools -> Options -> Advanced↩︎Alternatively, you also have the native Fonts manager tool under GNOME launch start↩︎
On Ubuntu, a more modern version of Java, the 21, was installed↩︎
Alternatively, download with
curl↩︎What matters the most here is uniformity across platforms↩︎
%AppData%is a shortened alias for this expanded path on Windows:C:\Users\<YourUser>\AppData\Roaming\RStudio↩︎If some of the setting changes were not applied, you can usually access them from the Menu options with
Tools > Global Options...↩︎Contrary to best guidelines suggested in Note 2.1, only the
flatpakandsnapinstallation are supported for Ubuntu devices -> no automatic updates with nativeaptUbuntu dependency manager↩︎Using a passphrase is not compuslory, but safer↩︎